
Home > UltraBac Administrator Guide > UltraBac Agents > vSphere Agent
The vSphere Agent provides users with the ability to back up their virtual machines without installing any agents on those virtual machines. It also allows users to back up from one central location.
|
NOTE: In UltraBac v.9.4 and later, support for NDBSSL and NFS backups was added. Only vSphere Essentials 4.x (and above) is supported. ESXi free edition is not supported due to licensing limitations set by VMware. |
|
NOTE: Virtual Machines must have Virtual Hardware Version 7 or greater. Virtual Machines configured with Raw Disk Mappings (RDM) or Independent Disks cannot be backed up. |
|
NOTE: Backups of Linux based Virtual Machines (VM) cannot be mounted for individual file recovery. These backups can be restored with any of the other methods, such as restoring to VMDK and attaching that disk to another Linux based VM. |
Launch the Backup Wizard by selecting the Backup tab, and clicking "New."
Select the "VMware vSphere Agent" and click "Next."
Fig. 1 - vSphere Agent options.
Select either Full or Incremental backup
|
NOTE: Full and incremental backups must be written to the same backup path. |
Type the Windows name or IP address of the Virtual Center in the "Virtual Center Name / IP address" field.
Type in the User name and password of the account you use to connect to vSphere. The user must have vCenter administrative privileges.
Select how you would like UltraBac to enumerate the Virtual Machines:
Enumerate all VM’s
Enumerate only powered on VM’s
Enumerate only powered off VM’s
Enumerate by VM name
Enumerate by VM IP address
Enumerate by MoRef
Enumerate by UUID
Select the transport mode to determine how the agent transfers the backup data:
Direct SAN / iSCSI – Backup server must be connected to the SAN Lun(s) as the ESX datastores. Best performance.
LAN (NBD) – Backup will be done over the network. Poor performance.
NDBSSL (LAN encrypted) – Backup will be done over the network using an SSL connection. Worst performance.
HotAdd (Virtual Appliance) – Backup server needs to be Virtual Machine on shared storage. Good performance.
Select "Failover to NBD" mode if you want UltraBac to attempt to use the NBD if the selected transport mode connection fails.
Click "Next."
Enter the name you wish to assign to the UltraBac set and click "Next."
Click "Finish."

Fig. 2 - Enumerated vSphere Agent backup set.
The following are limitations of the vSphere Agent:
Backups can only be saved to a backup path. If the backup is scheduled to a different device the set will be skipped.
Auto Deletion of Old Backups is not supported.
Verifications of vSphere backups are not supported and will be skipped during the verification process.
UltraCopy cannot currently be used in conjunction with this agent.
|
NOTE: All restores are performed via a LAN (NBD) connection. |
|
NOTE: The default UltraBac device MUST be the one containing the vSphere Agent backup to be restored. |
Launch the Restore Wizard by selecting the Restore tab, and selecting the index source.
Select and load the index for restore.
|
NOTE: If you choose to restore an incremental index, the necessary full and incrementals will automatically be restored. |
Select the VM Disks for restore.
Click "Action"/"Restore Selected Files."

Fig. 3 - vSphere Agent Restore Options.
Select the type of restore to perform.
|
NOTE: If you choose to restore the VM back to its original location (and the original disk exists), the restored disk will be named vmwarediskname-UBRestore.vmdk. |
Select "Restore Entire VM (Including Registration."
Click "Settings."

Fig. 4 - Configuring Full VM restore settings.
Type the vCenter name or IP address of the in the "vCenter Name / IP address" field. Defaults to the name / IP address used during the backup.
Enter a vCenter account that has full read and write permissions to the datastore you are recovering to in the "User name" field. Defaults to the user name used during the backup.
Enter the port used for connection into the "Port" field. The default is port 443.
Select 1 or more VMs and click "Modify VM Settings."

Fig. 5 - Modifying a single VM restore settings.

Fig. 6 - Modifying multiple VM restore settings.
Click "Save" to keep the changes and return to the previous window.
Click "Finish" to return to the main restore dialog.
Click "Next" to open the final restore options dialog window.

Fig. 7 - Select restore options
Click "Restore" to begin the restoration process.
Select "Restore VM Hard Disks only (VMDK)."
Click "Settings."

Fig. 8 - VMDK restore settings
Click "Save" to keep the changes and return to the previous window.
Click "Finish" to return to the main restore dialog.
Click "Next" to open the final restore options dialog window.
Fig. 9 - Select restore options
Click "Restore" to begin the restoration process
UltraBac has the ability to mount the vSphere backup as a local drive letter on the backup machine. This allows users to simply drag and drop files that are needed from the backup.
To perform this operation:
Launch the Restore Wizard by selecting the Restore tab, and selecting the index source.
Select and load the index for restore.
Select the VM Disk for restore.
Click "Action"/"Restore" selected files.
Click the "File Restore" button.
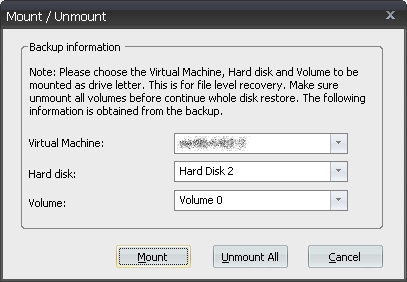
Fig. 10 - vSphere Mounting Options.
Select the Virtual Machine from the drop-down box.
Select the Hard disk from the drop-down box.
Select the preferred Volume from the drop-down box.
Click "Mount."
Once the drive is mounted, the necessary files can be dragged and dropped as needed.
To unmount a drive(s), click "Unmount All."
|
NOTE: If the set or UltraBac is closed before the backup is unmounted, simply launch the UltraBac Management Console and click on “Unmount All Volumes” located at “Tools”/“UBDR.” This will unmount any UltraBac mounted Image SFR, Hyper-V, or vSphere Agent backups. Alternatively, follow the same steps required to mount a backup until the "Unmount All" option button is visible. |